
When I started programming, and before the age of moving solutions to Azure Cloud, I was not concerned about where to save my data. Because in most cases I used the same storage space where the code was hosted on. In most cases, the solution was on-premise within the same domain and there were no issues giving other systems access rights to read from storage and write to storage.
While I developed my code back in time, I was able to use the default C# file or Java file class to read, write or manipulate files, either on my local computer or on local or remote test servers that we have had access to.
Over time and nowadays, a lot of solutions are migrating to Azure Cloud or other cloud solutions. Services like Azure App Service and Azure Blob Storage are isolated in different instances and because of security and compliance, as developers, we will have limited or no access to access data in storage, so in most cases, the access rights from Azure App Service to access Azure Blob Storage is managed by Managed Identity. As a developer, you will of course have access to the test environment, but in most cases when you work for Enterprise businesses, that is not possible. You think it is easy, but no is dead, it can be frustrating that you have been asked to develop a feature and you have no access to Azure Blob Storage as a developer. And you are left in a situation where you want to validate your Azure Blob Storage code but you do not have access permission to it. Here comes the question, how can I test and validate my read, write, or any other storage manipulation methods on Azure Blob Storage when I develop code locally and on CI in GitHub?
Of course, you can write a mocked unit test for local testing, but how to validate the method and make an integration test? In this article series, I will try to cover all steps required so any developer in C# or Java is able to validate and test methods before deploying code to Azure Cloud.
Prerequisites
Before we need to have a docker desktop installed on our computer.
Step 1, Deploy Azurite
The Azurite open-source emulator provides a free local environment for testing your Azure blob, queue storage, and table storage applications. When you’re satisfied with how your application is working locally, switch to using an Azure Storage account in the cloud. The emulator provides cross-platform support on Windows, Linux, and macOS.
Microsoft Azurite
Start the command line and run the following 2 docker commands:
// here we pull azurite image
docker pull mcr.microsoft.com/azure-storage/azurite
// here we run azurite image and store data under c:\azurite folder
docker run -p 10000:10000 -p 10001:10001 -p 10002:10002 -v c:/azurite:/data mcr.microsoft.com/azure-storage/azurite
You wonder what all these ports are. it will create 3 instances that represent the following:
http://0.0.0.0:10000 for Azurite Blob service
http://0.0.0.0:10001 for Azurite Queue service
http://0.0.0.0:10002 for Azurite Table service
Resource: link
Step 2, Install Azure Storage Explorer
This tool can be used to explore your Azure Storage Locally (Azurite) as well as your Azure Storage on Cloud.
Download and install the tool for the link below:
After installing and starting this tool. You need to find (Emulator – Default Ports) (Key) as shown in the image. Click on (Emulator – Default Ports) (Key) and you will find Primary Key and Connection String information that we need for our development as you can see in the image below.
Here you can create containers under Blob Containers.
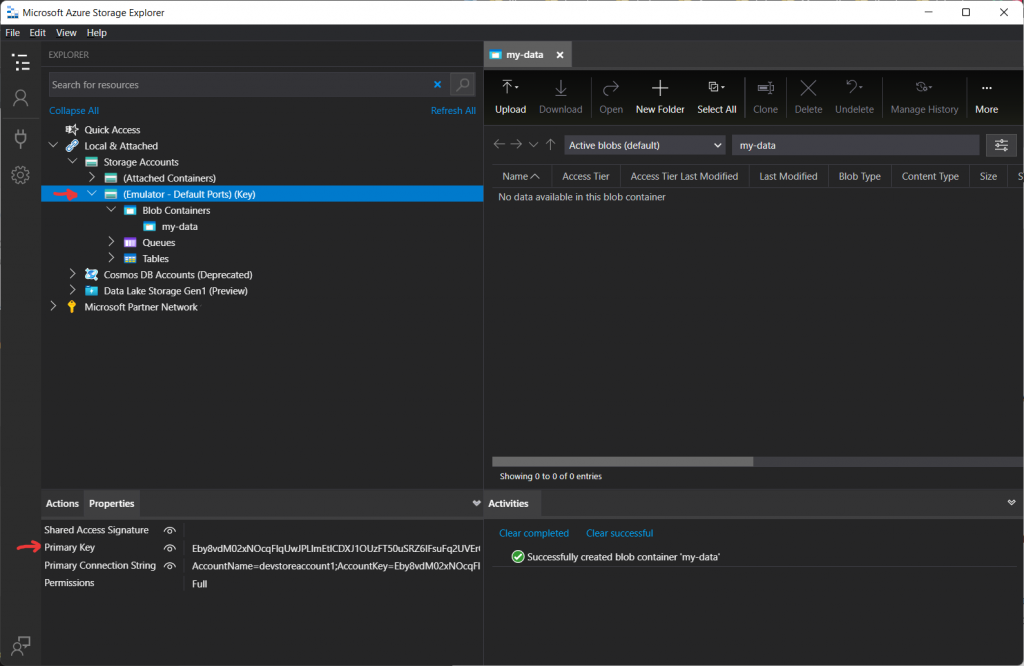
I have created a my-data container where I can upload files, by clicking on the upload button.
By default, you have the following parameters and predefined setting values:
Account name
devstoreaccount1Endpoints for instance type
BlobEndpoint: http://127.0.0.1:10000/devstoreaccount1;
QueueEndpoint: http://127.0.0.1:10001/devstoreaccount1;
TableEndpoint: http://127.0.0.1:10002/devstoreaccount1;
The Default Account key for all azurite is the same
Eby8vdM02xNOcqFlqUwJPLlmEtlCDXJ1OUzFT50uSRZ6IFsuFq2UVErCz4I6tq/K1SZFPTOtr/KBHBeksoGMGw==Now we can play with uploading and downloading blobs locally as you would have done it on Azure Storage.
Conclusion
In this part of this article series, we learned how to fire up Azurite docker and install Azure Storage Explorer. We have also tried to upload and download blob files to our local storage.
Now you might ask the question, where is the integration test? this is exactly what I am going to cover in part 2 and the next article. In this series, I will focus on C# language, and at a later point will also cover it with a Java example.
Btw besides Azure Blob Storage, the same concept can be used to validate and test Azure Queue Storage and Azure Table Storage.
Note, the reason I called it part main, this part is a reusable part of my other programming language articles. So I will refer to this part when I write integration tests for Java or maybe other programming languages.
Graphic credit
The banner in this article is designed by my ❤️ 15 years son Jassin Fahmi 😀.
Interesting, looking for part 2
The next part is online next week 12th of January.
Note: I am updating the 3 articles series with more accurate information and updating the github code as well. The main concept remain the same. If you have questions mean while please write to me here or directly.
‘I have created a my-data container where I can upload files, by clicking on the upload button.’
Hi, how did you create a container locally??? The Azure Storage Explore forbids to have a local container.
I found the place to create local containr…
That is great.